Duty3G/User Guide/Adding and Maintaining Duties
This page was last modified 05:31, 6 August 2007.From Documentation
Contents |
Adding and Maintaining Duties
With duty3G you can automate routine tasks, expedite tedious tasks, delegate sensitive tasks, and simplify complex tasks, while still retaining management control.
By encapsulating routine administration tasks as duties, you free your most expert UNIX and Windows staff to do more demanding and innovative work. Routine but sensitive or arcane jobs can be delegated to less qualified staff.
We recommend that you define duties for as much of your regular workload as you can. Any task that can be documented can be automated. Many commonly performed duties, duty roles and schedules are provided with duty3G.
This chapter describes the process of preparing for and defining different kinds of duties, adding schedule times and bringing crontab into line with duty3G.
Before You Begin Defining New Duties
- Decide who has administrative capabilities. For example, who can add new duties or change existing ones? Who will check the duty audit trail and how often? Refer to Duty3G Access in this guide and the companion guide COSmanager User Guide for further details on capabilities.
- Document the “who, how and when” for each task you want to automate or delegate.
- Collect the tasks into groups of related duties and define a set of duty roles to cover this collection.
- Assign duty roles to users.
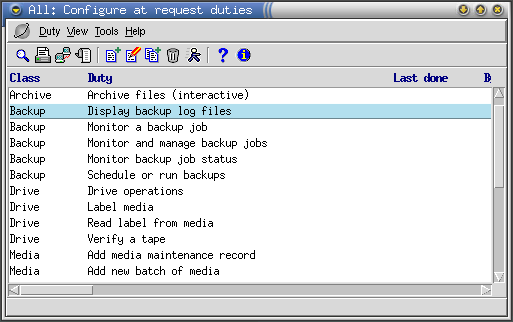
Duty3G configuration console
Users with sufficient access privileges can operate from the administrator’s console, which is started from the duty3G configuration option. See Duty3G Access for information on access privileges.
This console lets you display duties in a variety of convenient groupings, and maintain (add, change, clone, remove, order and test) those duties.
This console has more functions than the operator console and can be used to configure new duties, amend existing duties and remove unwanted items in addition to viewing and performing all available duties.
View options
The view options available from the configuration console are identical to those on the operator’s duty console. These are described in Viewing Duties. However, users need to bear in mind that the duties displayed are limited by the role defined for them in duty3G. An operator will only ever be able to view those duties that they are cleared to perform, whereas an administrator with top-level clearance will be able to view all defined duties.
To Define a Duty
Duties are provided with duty3G for many common operations and system administration tasks. To get the most from the duty list, you should tailor it to your site's needs by adding duties to automate all your other routine tasks.
Planning your duty procedures
As you plan what tasks should be defined as duties there are a few things to consider:
- can this activity be done in one step or are there two or more components that need to be done in order?
- must this duty be done in sequence – that is, before or after another duty (are there any dependent duties)?
- should it be done on a regular cycle, or will it be done only when needed?
- if it is scheduled to be done on a given day and isn’t, should it be carried over to the next day or shift? Should it be marked as overdue/outstanding or be abandoned?
- does this activity require user intervention or can it be run automatically?
- should it run at a set time of day or within a shift or time period?
- what commands or shell scripts will be used?
- which user ID should this command execute under, and on what host should the command be run?
- should the duty be performed as soon as it is selected, or should the user be prompted for confirmation before proceeding?
- which duty role does this activity belong to?
- does the duty need to be run under a COSmanager application (e.g. a backup duty requires backup3G to run)
How to Define a Scheduled Duty
You may want to look at the ‘Duty list report’ in the duty3G configuration console for some examples of scheduled duties that have already been defined.
To define a new scheduled duty
- Select duty3G configuration.
- From the duty configuration console, select Duty > Add.
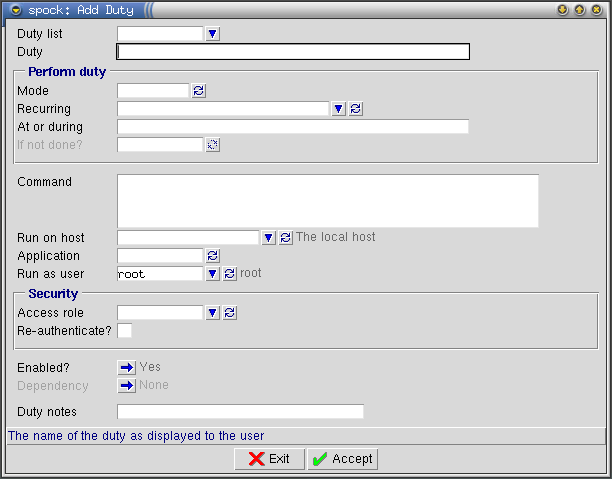
Fill in the following fields:
- Duty list
- Enter or choose duty list this duty is to belonf to. The duty console will display the duties grouped by duty list.
- Duty
- Enter a name for the duty. This is the description that will appear in the list of duties to be performed.
- Mode
- Select ‘scheduled’ in the run mode.
- Recurring
- Now choose the schedule to which the duty will be run. You can add a new schedule time if none of the existing ones are suitable – see Adding a Schedule Time.
- At or during
- If you wish to alter the time period during which it should be preformed you can override the period specified in the schedule time. Enter a start time and end time in the format HH:MM-HH:MM, -HH:MM or HH:MM-. This duty will only appear on the list of outstanding scheduled duties between these times on the days specified in the schedule time.
| Note | |
| In the schedule time you specify a start time and a period during which the duty should be performed. In the duty you specify a start time and an end time. | |
- If not done?
- What should happen if the duty isn’t performed on the scheduled day? The options are:
outstanding leave the duty outstanding if not performed overdue mark duty as overdue if not performed abandon remove duty from the list of outstanding duties
- Command
- Type in the command that you want executed. This can be any command or series of commands that could be entered at the shell prompt, including Functional Toolset commands and variables created by duty3G.
- Pause?
- Select ‘yes’ to prompt the user to press Return after the command has executed.
| Note | |
| 'Pause?' only displays if you are using the character based interface (CUI). | |
- Run on host
- Choose the host on which the command is to be run. The field defaults to the name of the current host.
| Note | |
| Duties run on a remote host are executed using the communications method set up for that host, and so can’t be interactive. | |
- Application
- If the duty runs under another application such as backup3G, select the required application here. Leave the field blank if no other application needed.
- Run as user
- Select the login ID of the user this command is to be executed under. This should be chosen to give the command the permission needed to perform the task. Use ‘Self ’ if this duty is to be run under the login ID of the user executing the task. The default user ID is ‘root’.
- Access role
- Select the role to which this duty belongs. By convention, the role ‘Other’ is used for duties that are to be given to all users.
- Re-authenticate?
- Select 'yes' to prompt the user for their password before running the command.
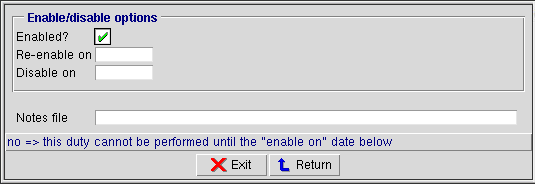
Press Enabled to define enable options for this duty.
- Enabled?
- Select ‘yes’ if this duty should be enabled now. Disabled duties do not appear in the duty list.
- Enable on
- If the duty is to be disabled temporarily, give a date for the duty to be automatically enabled. Select ‘no’ for Enabled? and leave the Enable on field blank to disable the duty indefinitely.
- Disable on
- If the duty is to be disabled temporarily, give a date for the duty to be automatically disabled.
Press Return.
Press Dependency to define a dependency for this duty.
- Dependency
- Select any duty that has to be performed before the current duty can be executed. If this duty is not to be dependent on other duty, leave the field blank.
Press Return.
- Duty notes
- Enter a file name for a text or HTML document containing associated Operator notes for this duty. The file must be stored in
duty_5.1/local/notes.
Press Accept to finish defining this duty.
How to Define an Automatic Duty
You may want to look at the ‘Duty list report’ in the duty3G configuration console for some examples of automatic duties that have already been defined.
To define a new automatic duty
- Select duty3G configuration.
- From the duty configuration console, select Duty > Add.
Fill in the following fields:
- Duty
- Enter a name for the duty. This is the description that will appear in the list of duties to be performed.
- Mode
- Select ‘automatic’ in the run mode.
- Recurring
- Now choose the schedule to which the duty will be run. You can add a new schedule time if none of the existing ones are suitable – see Adding a Schedule Time.
- At or during
- Enter a time or list of times (see Run Time for Automatic Duties for more on time formats). The duty will run at these times on the days specified in the previous step.
- Command
- Type in the command that you want executed. This can be any command or series of commands that could be entered at the shell prompt, including Functional Toolset commands and variables created by duty3G. The commands should not be interactive.
- Run on host
- Choose the host on which the command is to be run. The field defaults to the name of the current host.
- Application
- If the duty runs under another application such as backup3G, select the required application here. Leave the field blank if no other application needed.
- Run as user
- Select the login ID of the user this command is to be executed under. This should be chosen to give the command the permission needed to perform the task. Use ‘Self ’ if this duty is to be run under the login ID of the user executing the task. The default user ID is ‘root’.
Press Enabled to define enable options for this duty.
- Enabled?
- Select ‘yes’ if this duty should be enabled now. Disabled duties do not appear in the duty list.
- Enable on
- If the duty is to be disabled temporarily, give a date for the duty to be automatically enabled. Select ‘no’ for Enabled? and leave the Enable on field blank to disable the duty indefinitely.
- Disable on
- If the duty is to be disabled temporarily, give a date for the duty to be automatically disabled.
Press Return.
- Duty notes
- Enter a file name for a text or HTML document containing associated Operator notes for this duty. The file must be stored in
duty_5.1/local/notes.
Press Accept to finish defining this duty.
How to Define an At-request Duty
You may want to look at the ‘Duty list report’ in the duty3G configuration console for some examples of at-request duties that have already been defined.
To define a new at-request duty
- Select duty3G configuration.
- From the duty configuration console, select Duty > Add.
Fill in the following fields:
- Duty list
- Enter or choose duty list this duty is to belonf to. The duty console will display the duties grouped by duty list.
- Duty
- Enter a name for the duty. This is the description that will appear in the list of duties to be performed.
- Mode
- Select ‘request’ for the run mode.
- Command
- Type in the command that you want executed. This can be any command or series of commands that could be entered at the shell prompt, including Functional Toolset commands and variables created by duty3G.
- Pause?
- Select ‘yes’ to prompt the user to press Return after the command has executed.
| Note | |
| 'Pause?' only displays if you are using the character based interface (CUI). | |
- Run on host
- Choose the host on which the command is to be run. The field defaults to the name of the current host.
| Note | |
| Duties run on a remote host are executed using rsh, and so can’t be interactive. | |
- Application
- If the duty runs under another application such as backup3G, select the required application here. Leave the field blank if no other application needed.
- Run as user
- Select the login ID of the user this command is to be executed under. This should be chosen to give the command the permission needed to perform the task. Use ‘Self ’ if this duty is to be run under the login ID of the user executing the task. The default user ID is ‘root’.
- Access role
- Select the role to which this duty belongs. By convention, the role ‘Other’ is used for duties that are to be given to all users.
- Re-authenticate
- Select 'yes' to prompt the user for their password before running the command.
Press Enabled to define enable options for this duty.
- Enabled?
- Select ‘yes’ if this duty should be enabled now. Disabled duties do not appear in the duty list.
- Enable on
- If the duty is to be disabled temporarily, give a date for the duty to be automatically enabled. Select ‘no’ for Enabled? and leave the Enable on field blank to disable the duty indefinitely.
- Disable on
- If the duty is to be disabled temporarily, give a date for the duty to be automatically disabled.
Press Return.
- Duty notes
- Enter a file name for a text or HTML document containing associated Operator notes for this duty. The file must be stored in
duty_5.1/local/notes.
Press Accept to finish defining this duty.
Assigning a Duty to a Different Access Role
Operators can only run duties belonging to one of their access roles. You can see which role a duty is assigned to in the duty configuration console.
To assign a duty to a different group of duty3G users:
- Select duty3G configuration.
- Select the duty, then select Duty > Change.
- Move to the By role field, and press Choose. Choose another role.
Press Accept to save the duty.
Adding a Schedule Time
Schedule times define processing cycles for running duties. A schedule time specifies the day and optionally a ‘time window’ or shift during which a duty is scheduled to be run. You choose from this list when defining a scheduled or automatic duty. You can add new schedule times based on your own shifts and processing cycles to the schedule times provided with duty3G.
There are two ways to define schedule times, listing a combination of times or defining a command:
List method
The first method is to list a combination of scheduled days and times in the day, month, and time fields. All the fields must return ‘true’ for the duty to be scheduled – that is, there is a logical AND between the day and month fields and the time period.
This method is more flexible as it lets you specify that a duty must be performed by a particular shift or between certain hours. See Scheduled Duties, Schedule Times and Shifts for more details and examples.
Command method
The other way is to define a schedule command using a command that returns ‘true’ or ‘false’ for the current date, such as db_datemat. Scheduled duties will be displayed only if db_datemat returns ‘true’ for today’s date.
Adding a schedule time using the list method
- Select Tools > Schedules from the duty3G configuration console.
- Select Maintain > Add.
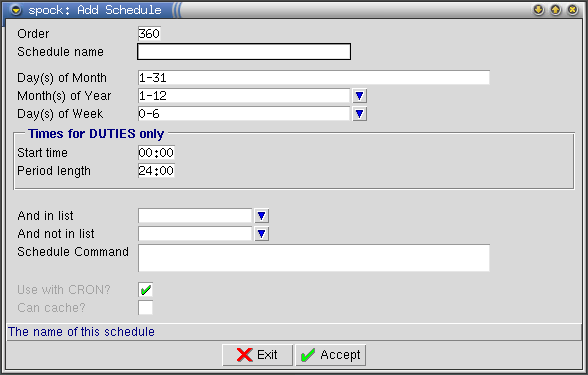
- Order
- Duty3G allocates an order number, by default ten more than the previous highest. The order number determines the order in which the list of outstanding scheduled duties is presented to the user. If you want to keep the new time with a group of similar schedule times, change the order to an available number close to that of the group.
- When
- Enter a descriptive term, consistent with the names displayed in the list of schedule times.
- Schedule command
- Leave blank for date/time matching.
The next three fields control which days a duty will be scheduled. By default the fields return ‘true’ for every day of the month, every month of the year, and every day of the week. You restrict the scheduled days by limiting one or more of the fields to certain values or ranges.
- Day of Month
- Enter a list of days of the month.
Example: first week of the month: 1-7 - Month of Year
- Enter a list of months.
Example: first month of every quarter: 1,4,7,10 - Day of Week
- Enter the days of the week (0 = Sunday, 6 = Saturday)
Example: Monday to Wednesday and Friday: 1-3,5 - Start time, Period length
- By default a duty is scheduled to be done any time on the scheduled day. To restrict this to a shorter period such as an operator shift, enter the start time and a period in hours and minutes.
Example: Specify a schedule time from 10 pm on the scheduled day to 6 am the following day:
Start time 22:00
Period length 08:00 - Comment
- If you wish you can enter a comment about this schedule time.
Press Accept to complete the definition of the schedule time.
Adding a schedule time using the command method
- Select Duty > Schedules from the duty3G configuration console.
- Select Maintain > Add.
- Order
- Duty3G allocates an order number, by default ten more than the previous highest. The order number determines the order in which the list of outstanding scheduled duties is presented to the user. If you want to keep the new time with a group of similar schedule times, change the order to an available number close to that of the group.
- When
- Enter a descriptive name, consistent with the names displayed in the list of schedule times.
- Schedule command
- Enter a command (using db_datemat or similar) which will return ‘true’ only if today’s date is when the duty should be run.
- Comment
- If you wish you can enter a comment about this schedule time.
Press Accept to complete the definition of the schedule time.
Synchronizing crontab
To ensure that the automatic duties in the duty list are correctly replicated in the COSmanager crontab, use Tools > Sync crontab on the duty3G configuration console. Carry out this task if problems are experienced with automatic duties in duty3G which may be caused by inconsistencies between the tables.
On selecting the Sync crontab option, duty3G displays a dialogue box, which indicates what is about to happen and provides the option to exit or to proceed.
Press Accept to synchronize the tables; duty3G will return a message indicating the outcome of the task.
| Note | |
| This task does not alter the root crontab in any way; the only table amended is the COSmanager crontab. | |


