Task3G/User Guide/Appendices
From Documentation
| Revision as of 04:51, 30 May 2013 Mike (Talk | contribs) (→Tutorial 4: Creating a Task) ← Previous diff |
Revision as of 04:54, 30 May 2013 Mike (Talk | contribs) (→Tutorial 6: Creating Wait Conditions) Next diff → |
||
| Line 584: | Line 584: | ||
| == Tutorial 6: Creating Wait Conditions == | == Tutorial 6: Creating Wait Conditions == | ||
| - | #Highlight job2 and select {{cnav|Maintain > Task in job}} . At this point you will be presented with the Tasks in job console which contains a list of all tasks in the selected job, being job2 in this case. It's from here where you can wait conditions. | + | #Highlight job2 and select {{cnav|Maintain > Task in job}}. At this point you will be presented with the Tasks in job console which contains a list of all tasks in the selected job, being job2 in this case. It's from here where you can wait conditions. |
| - | #Select job8 | + | #Select task8 |
| #Select {{cnav|Dependencies > Wait for}} | #Select {{cnav|Dependencies > Wait for}} | ||
| #Enter the following for each relevant field: | #Enter the following for each relevant field: | ||
| Line 591: | Line 591: | ||
| ::{| border="0" cellpadding="3" cellspacing="0" | ::{| border="0" cellpadding="3" cellspacing="0" | ||
| ! align="left" width="145" style="border-bottom:1px solid grey;border-right:1px solid grey;" | Field | ! align="left" width="145" style="border-bottom:1px solid grey;border-right:1px solid grey;" | Field | ||
| - | ! align="left" width="145" style="border-bottom:1px solid grey;" | Wait condtion | + | ! align="left" width="145" style="border-bottom:1px solid grey;" | Wait condition |
| |- | |- | ||
| - | | valign="top" style="border-bottom:1px solid grey;border-right:1px solid grey;" | Wait condtion | + | | valign="top" style="border-bottom:1px solid grey;border-right:1px solid grey;" | Wait condition |
| | style="border-bottom:1px solid grey;" | $job1:task7 | | style="border-bottom:1px solid grey;" | $job1:task7 | ||
| |- | |- | ||
Revision as of 04:54, 30 May 2013
Contents |
Appendix A—Installing task3G
This section describes how to install task3G for your environment. Task3G is installed through the COSmanager configuration menu.
See Installing COSmanager Applications in the COSmanager User Guide for full details.
What you need
- the COSmanager framework installed on the target platform
- a distribution file containing the task3G software
- a valid license key
- you must be a COSmanager user with the Manager role
Installing task3G
- Load the CDrom in a CD drive on the local host or a network CD drive.
- Mount the CDrom using the appropriate mount command for your operating system (listed on the inside of the CD jacket).
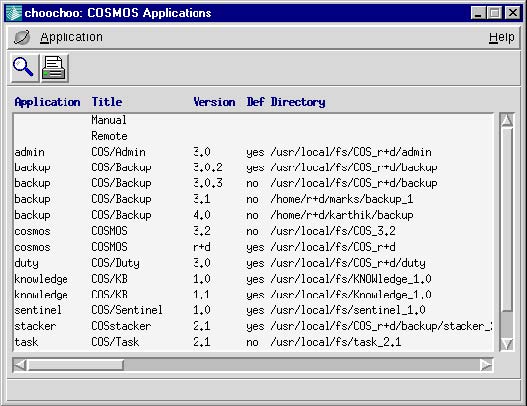
- From the Product configuration menu, select COSmanager configuration > COSmanager applications .
- Select Application > Install .
- Enter the name of the host to which the CD drive is attached. In Install from, enter the file name containing the product distribution. Press Accept.
- You will see the application contained in the distribution file. Choose the row titled task3G version 4.1.
- Enter the name of the directory where you want task3G to be installed and press Accept.
COSmanager copies the task3G files from the CD distribution file to the target directory and creates the task3G audit trail.
Appendix B—Job Recovery Action Outcomes
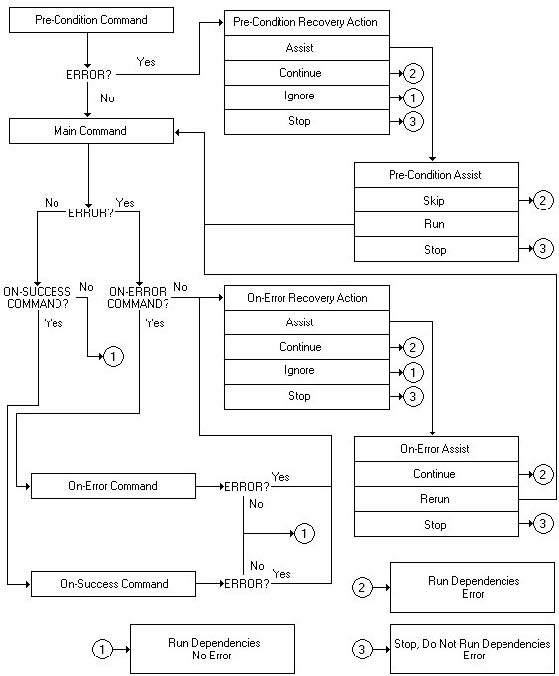
The following diagrams contained in this appendix illustrate the actions for each type of job recovery.
In figure 21, the flow of the pre-condition and error job recoveries are illustrated. One thing to keep in mind is that depending which override status is selected (this is configured in when defining a job, see How to Define a Task on page 36.) will depend on what status the task will end in if an On-error command is defined.
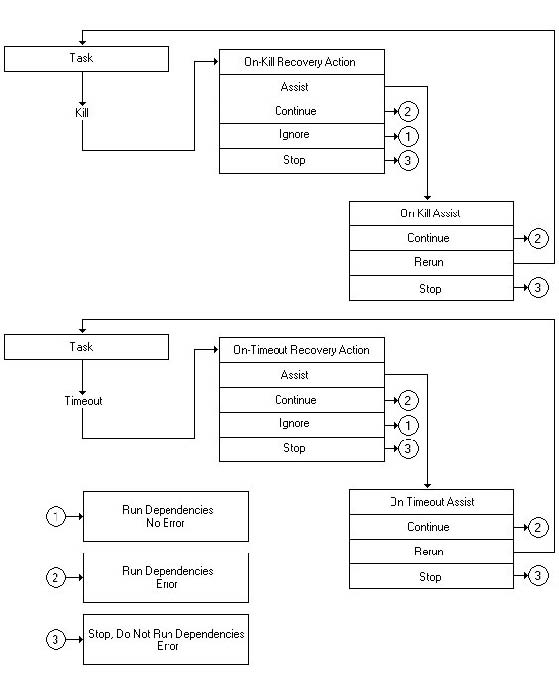
Figure 22 illustrates the kill and timeout job recovery actions.
Appendix C—Tutorial
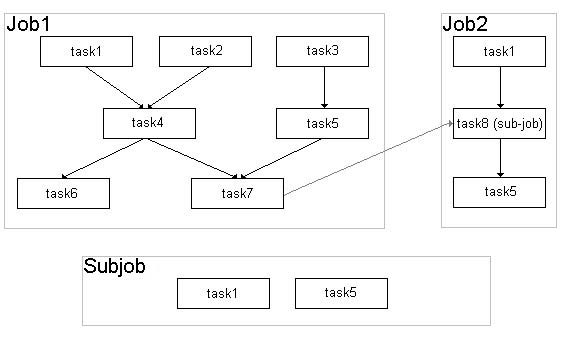
The following diagram represents the relationships between the jobs and tasks that will be created and run.
Entering Configuration
To start COSmanager either:
- Login as 'root'
OR
- Login as a COSmanager 'Manager' and run 'cos'
- Click on the Config button from the COSmanager menubar.
- From the Product Configuration menu select task3G Configuration. You will now be presented with the task3G jobs console. This is where all configuration is done.
Tutorial 1: Creating a Queue
- To configure a queue, select Tables > Queues . At this point you will be presented with the Job queue details console which contains a list of all currently defined queues. It's from here where you can Add, Change, Clone or Delete queues.
- Select Maintain > Add to create a queue.
- Enter the following for each relevant field:
Field Data Queue D_queue Description D queue - tutorial Unix queue d Concurrent jobs 2 Rescheduled time 60 Priority 2
- When done, press Accept. There should now be an acknowledgment that the QUEDEFS has been updated and an addition of the item D_queue was successful. The queue should now appear on the Job queue details console.
- You have successfully created a queue.
| Note | |
| For more information, see How to Define a Job Queue | |
Tutorial 2: Creating a Job
At this point you will be presented with the task3G jobs console which contains a list of currently defined jobs and subjobs. It's from here where you can Add, Change, Clone or Delete jobs Repeat these steps for each of the following jobs.
- Select Maintain > Add to create a job.
- Enter the following for each relevant field:
Field Job1 Job2 Job job1 job2 Description Job1 - tutorial Job2 - tutorial Mode manual manual When N/A N/A At time(s) On (day) N/A N/A Access role Other Other Run on Host Queue D_queue AT_queue Fixed parameters Prompt form At-submit command Wait condition Timeout (mins) Pre-condition On failure N/A N/A At-end command Clear status submit submit Concurrent jobs Priority Notes
- When done press Accept .
- The jobs should now appear on the task3G jobs console. You have successfully created the jobs.
| Note | |
| For more information, see How to Define a Job. | |
Tutorial 3: Creating a Subjob
At this point you will be presented with the task3G jobs console which contains a list of currently defined jobs and subjobs. It's from here where you can Add, Change, Clone or Delete subjobs.
- Select Maintain > Add to create a job.
- Enter the following for each relevant field:
Field Subjob Job subjob1 Description Subjob1 - tutorial Mode subjob When N/A At time(s) N/A On (day) N/A Access role Other Run on Host Queue N/A Fixed parameters N/A Prompt form At-submit command N/A Wait condition Timeout (mins) N/A Pre-condition On failure N/A At-end command Clear status N/A Concurrent jobs N/A Priority N/A Notes
- When done press Accept .
- The subjob should now appear on the task3G jobs console. You have successfully created a subjob.
| Note | |
| For more information, see How to Define a Job. | |
Tutorial 4: Creating a Task
To configure a task, select Tables > Tasks . At this point you will be presented with the Tasks console which contains a list of currently defined tasks. Its from here where you can Add, Change, Clone or Delete tasks.
Repeat these steps for each of the following jobs.
- Select Maintain > Add to create a task.
- Enter the following for each relevant field:
Field Task1 Task2 Task3 Task3 Task5 Task6 Task7 Task8 Task name task1 task2 task3 task4 task5 task6 task7 task8 Command sleep 5 sleep 5; exit 1 sleep 5; exit 1 sleep 5; exit 1 sleep 5 sleep 5; exit 1 sleep 5 N/A Run on host N/A As user N/A Subjob N/A N/A N/A N/A N/A N/A N/A subjob1 Comment Task1 - tutorial Task2 - tutorial Task3 - tutorial Task4 - tutorial Task5 - tutorial Task6 - tutorial Task7 - tutorial Subjob - tutorial Pre-condition On-success cmd On-error cmd Override status N/A no N/A N/A N/A N/A N/A N/A Timeout (mins) On-error assist assist continue assist assist ignore assist assist On pre-cond fail N/A N/A N/A N/A N/A N/A N/A N/A On kill assist assist assist assist assist assist assist assist On timeout N/A N/A N/A N/A N/A N/A N/A N/A Can re-run yes no yes yes yes no yes yes Can continue yes yes yes yes yes yes yes yes Can kill yes no yes yes yes no yes yes Notes
- When done press Accept .
- The tasks should now appear on the Tasks console. You have successfully created the tasks.
| Note | |
| For more information, see How to Define a Task. | |
Tutorial 5: Adding Tasks to a Job and Creating Dependencies
- Highlight job1 and select Maintain > Task in job . At this point you will be presented with the Tasks in job console which contains a list of all tasks in the selected job, being job1 in this case. It's from here where you can add tasks to a job and create dependencies.
- Select Maintain > Add to add the tasks. A list of all tasks will be presented. Select all the tasks needed for job1. These are: task1, task2, task3, task4, task5, task6 and task7.
- When done press Accept . All the tasks now should appear in the Tasks in job console. In the current configuration all the tasks will run in parallel. Looking at the task relationships within job1 from the diagram presented at the start of this appendix, task1, task2 and task3 are not dependent on any other task and will run in parallel. All other tasks are dependent on another task.
The following steps create the dependencies for task4.
- Highlight task4.
- Select Dependencies > Cut .
- Highlight task1.
- Select Dependencies > Paste . Task4 should now appear with indentation under task1. This signifies that task4 is dependent on task1.
- Highlight task4.
- Select Dependencies > Link .
- Highlight task2.
- Select Dependencies > Paste . Task4 should now also appear with indentation under task2. This signifies that task4 is dependent on task2. A task can only appear in a job once but dependent on multiple tasks. The first instance of a task in a job dependency structure is displayed normally, and all other instances (multiple dependencies) are represented by links.
The following steps create the dependencies for task5.
- Highlight task5.
- Select Dependencies > Cut .
- Highlight task3.
- Select Dependencies > Paste .
The following steps create the dependencies for task6.
- Highlight task6.
- Select Dependencies > Cut .
- Highlight task4.
- Select Dependencies > Paste .
The following steps create the dependencies for task7.
- Highlight task7.
- Select Dependencies > Cut .
- Highlight task4.
- Select Dependencies > Paste .
- Highlight task7.
- Select Dependencies > Link .
- Highlight task5.
- Select Dependencies > Paste .
All the dependencies have now been created.
- Select Dependencies > Optimise to check and correct any deadlocks.
Move onto the next job.
- Select View > Another job .
- Highlight job2
- A list of all jobs will be presented. Select job1.
- When done press Accept . At this point you will be presented with the Tasks in job console which contains a list of all tasks in the selected job, being job2 in this case.
It's from here where you can add tasks to a job and create dependencies.
- Select Maintain > Add to add the tasks. A list of all tasks will be presented.
- Select all the tasks needed for job2. These are: task1, task5 and task8.
- When done press Accept . All the tasks now should appear in the Tasks in job console. In the current configuration all the tasks will run in parallel. Looking at the task relationships within job2 from the diagram presented at the start of this appendix, task1 is not dependent on any other task. All other tasks are dependent on another task.
The following steps create the dependencies.
- Highlight all tasks.
- Select Dependencies > Sequence .
- Select task5 and holding down the left mouse button, drag task5 to the bottom of the list. The list should be in the following order: task1, task8, task5.
- When done press Accept . A sequence of dependent tasks should now appear.
Configure the subjob.
- Highlight task8.
- Select View > Subjob . At this point you will be presented with the Tasks in job console which contains a list of all tasks in the selected subjob, being subjob1 in this case. It's from here where you can add tasks to a subjob and create dependencies.
- Select Maintain > Add to add the tasks.
- A list of all tasks will be presented. Select all the tasks needed for subjob1. These are: task1 and task5.
- When done press Accept . All the tasks now should appear in the Tasks in job console. In the current configuration all the tasks will run in parallel. Looking at the task relationships within subjob1 from the diagram presented at the start of this appendix, task1 and task 5 are not dependent on any other task. Therefore no dependencies need to be configured.
You have successfully populated the jobs and created the dependencies. You have successfully populated the jobs and created the dependencies.
Tutorial 6: Creating Wait Conditions
- Highlight job2 and select Maintain > Task in job . At this point you will be presented with the Tasks in job console which contains a list of all tasks in the selected job, being job2 in this case. It's from here where you can wait conditions.
- Select task8
- Select Dependencies > Wait for
- Enter the following for each relevant field:
Field Wait condition Wait condition $job1:task7 Timeout (mins) On failure assist
- Press Check syntax to check the syntax of the wait condition.
- When done, press Accept.
- You have successfully created a wait condition.


