Backup3G/Backup3G 5.2 Release Notes
From Documentation
| Revision as of 07:05, 17 December 2007 Moff (Talk | contribs) (→CPIO file restore options) ← Previous diff |
Revision as of 07:12, 17 December 2007 Moff (Talk | contribs) (→Verify media after the backup job has completed) Next diff → |
||
| Line 300: | Line 300: | ||
| ==== Verify media after the backup job has completed ==== | ==== Verify media after the backup job has completed ==== | ||
| + | |||
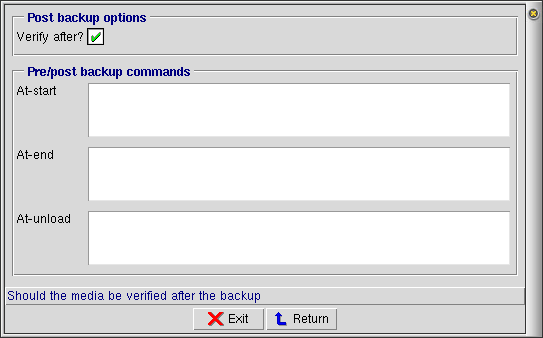
| + | [[Image:Backup job verify.png|frame|Figure 4 — Verify backup media after the backup job has completed]] | ||
| + | |||
| blah | blah | ||
Revision as of 07:12, 17 December 2007
Contents |
Overview and Features
Backup3G
Backup3G 5.2 facilitates a standard approach to backup and recovery and the management of media in multi-host, multi-vendor UNIX, Linux and Windows data centres. All the information required to run comprehensive network backups is packaged in the backup job. There is no requirement for operators or administrators to understand subtle platform dependent variations in backup commands and devices. The automation of routine backups saves time, frees up resources, and reduces the possibility of human error.
New features in backup3G 5.2
Simpler Configuration
- You can create backup items and add steps using a wizard as part of adding a new backup job
Enhanced Operations
- A backup piece can span across 2 or more tapes
- Collapse intermediate directories
- Rename file if older version exists
- Search also searches structured data (database) backups
- You can make file searches case insensitive
- Verify media will report against media database
Improved Auditing
- The Backup3G audit trail logs:
- killing of backup, recovery and duplicate media jobs.
New features in backup3G 5.1
Simpler Configuration
- Disable a backup job on a given date.
- Re-enable a backup job on a given date.
- Append a job to media based on group name.
- Schedule a secondary copy of the backup media from the backup job.
- Verify media after the backup job has completed.
- Send notification based on success status of the backup job. The backup log can be optionally attached.
- Test network communication for a given backup job, testing communications between the Master, Drive and File hosts as configured for that job.
- Method sensitive forms for backup items, making it simpler to set options.
- Folders can be browsed making it simpler to set up unstructured data backup items.
- The incremental backup methods have been renamed to differential.
- You can discover filesystems and volumes for given hosts, creating backup items for those found.
- You can filter your view of backup items by host or object.
- Various global settings can be set to change the behaviour of backup3G. These include:
- Remote access control
- Drive inactivity timeout
- Direct I/O blocksize
- Meta-data replication
- Notification.
Enhanced Operations
- The run history of a selected backup job can be viewed over various date periods.
- Send notification when there are no more available media.
Improved Auditing
- The Backup3G audit trail logs the start and end and level of success of:
- backup jobs
- media copies
- re-indexing media
- media library inventory
- recovery jobs
- meta-data replication.
- The configuration audit trail logs all changes in backup3G tables.
- The operations audit trail logs all action invocations from:
- backup scheduling console
- recovery console
- media management console
- drive and media library consoles
- job monitor console.
Documentation
- A HTML or text document can be associated with a backup job, so end users can see what Policies and Procedures the backup is supporting.
- The user guide, release notes and other documentation can be viewed via your favourite browser.
Installation Requirements
Software prerequisites
To install and run backup3G 5.2 on a host, you must have:
- COSmanager 4.2.5 or newer already installed on the host (see the COSmanager User Guide for instructions)
- a backup3G distribution
- a valid license key for this host (see your COSmanager distributor if you don’t have a valid license key)
- sufficient disk space
- COSmanager Manager access, or equivalent
- the ability to open a root shell
Disk space required
| Software | Approximately 1.5 MB in the backup3G home directory. |
|---|---|
| Temporary Files | While installing backup3G: less than 1.5 MB, to hold a copy of the software distribution. While backup3G is running: less than 5 MB in /tmp. |
| Audit Trails | For the backup3G audit trail, about 10 - 50 MB in the system spool area. The actual amount will depend on the activity on your system (e.g. how many backups are run), and how often you archive and delete the log files. |
| For the operations audit trail, about 10 - 50 MB in the system spool area. The actual amount will depend on the activity on your system. | |
| For the configuration audit trail, about 10 - 50 MB in the system spool area. The actual amount will depend on the configuration activity on your system. | |
| Backup and Restore Logs | For the backup3g backup and restore logs, up to 200 MB for a small backup environments, or up to 1 GB for medium to enterprise backup environments in the system spool area. |
Running Remote Backups on Windows
The current backup3G release supports running remote backups and restores on Windows hosts which have the EWC (Enterprise Windows Client) 3.1.1 installed. This product may be purchased separately.
Related Software
The release of backup3G 5.2 coincides with the release of stacker3G 5.1 (module), VTL3G (module), DA_Oracle 5.1 (module) and duty3G 5.1 (application).
Upgrading COSbackup 3.2.1-3.2.6 or Backup3G 5.1
- Download the distribution file to
/tmpon the target host. - From the Configuration menu, select COSmanager configuration > Applications .
- Select Application > Install .
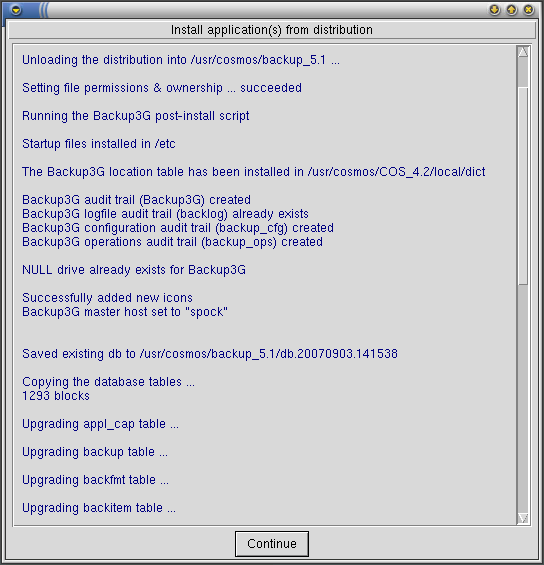
- Press Choose. You will see a list of the applications that can be installed. Choose the entry titled Backup3G 5.2, and press Accept.
- COSmanager copies the backup3G files from the distribution file to the target directory, updates the backup3G backlog audit trail and creates the new audit trails.
- You will be asked which host is the backup3G Master host. Press this host, or choose another host.
- To migrate your existing COSbackup 3.2 or backup3G 5.1 release database to the newly installed version press Copy. Your existing database is copied and updated with new table columns and rows.
- Media contents, media indices and backup logs can use a large amount of disk space. You have the option to Move or Copy each of these to the new database. We recommend that you use Copy if sufficient disk space exists.
- The upgrade process searches for and removes any backup items, step and backup methods that may perform a tape rewind or media scan (media verification). The removal of these is critical. If a backup job is allowed to rewind the tape by way of a backup step or the At-end command the backup may be rendered irrecoverable. Press Log to review the upgrade. Once you are satisfied, press Agree.
- To migrate custom files and programs from the local directory structure, and review locally modified or patched COSbackup programs start by pressing List. This allows you to review which files are consider to be custom files and which are modified versions of COSbackup files.
- To copy custom files to the newly installed version press Custom. Select those files to copy and press Accept.
- To review the differences of locally modified files press Local. Select a file and a list of differences between the local file and the newly installed file will be displayed. There is no option to copy any locally modified files. This must be done from a root shell.
- Once you have completed the copy of any custom files and the review of locally modified or patched files press Done.
- To make the newly installed backup3G the default version press Accept, then press Continue. You will see a warning about non-shared databases - just press Continue to set backup3G 5.2 as the default.
- Any automatic backup jobs are added or re-added to the cosmos crontab.
- This completes the upgrade installation. You must now restart COSmanager for the new version of backup3G to come into affect.
| Caution! | |
| If a backup job is allowed to rewind the tape by way of a backup step or the At-end command the backup may be rendered irrecoverable. | |
| Note | |
The installation and migration produces 1 or 2 log files in your /tmp directory. They are named:
Please send these to your COSmanager distributor for review. | |
Technical Notes: Using backup3G 5.2
This section contains some technical notes, tips, and troubleshooting information to help you when installing or upgrading to backup3G 5.2.
Temporary or trial licensing
Backup3G may be issued with a temporary license for use in trials or demonstrations. Temporary licenses have an in-built expiry date. You must obtain a permanent license or a new temporary license from your COSmanager distributor to keep using backup3G after the expiry date.
| Note | |
| Backup3G won’t install if the license key is due to expire within the next 7 days. In this case you will need to obtain a new license key from your COSmanager distributor. | |
COSmanager framework version required for backup3G 5.2
Backup3G 5.2 requires COSmanager 4.2.5 or newer.
Schedules and Schedtime
Backup3G 5.2 (as in 5.1) uses the newer, more generalised scheduling provided in COSmanager 4.2 releases. These include the datelist and schedule tables, which supersede the schedtime table (as used in COSbackup 3.2 releases). The schedtime table is now deprecated. It is important to note that the schedtime and schedule tables are maintained separately, and so changes to one table will not be reflected in the other. You should only maintain the schedule and datelist tables. You can do this via:
- Backup3G configuration > Tools > Schedules , or
- COSmanager configuration > Other tables > Schedule .
Arbitrary commands can easily be run as part of a backup job
blah.
Media scan item removed
blah
| Caution! | |
| If a backup job is allowed to rewind the tape by way of a backup step or the At-end command the backup may be rendered irrecoverable. | |
Audit Trails
When backup3G is installed, three new audit trails are created: Backup3G, backup_cfg and backup_ops. By default, these are created in the system spool area (usually /usr/spool or /var/spool). The Backup3G audit trail is the primary audit trail, recording all user actions, such as:
- running a backup, recovery and media duplication job, noting the exit status;
- killing a backup, recovery and media duplication job;
- replicating the meta-data database to a standby host;
- media library inventories.
Depending on the volume of backups run, these directories may become large, so it is important that audit trail cycling be configured correctly for your site to prevent these files from growing unbounded. By default the audit trails are cycled:
Backup3G monthly, retaining for one year backup_cfg monthly, retaining for six months backup_ops monthly, retaining for six months.
New Features in this Release
A backup piece can span across 2 or more tapes
blah
CPIO file restore options
Restoring files from a CPIO backup now has the following behaviour:
- When restoring a complete step, files and directories are restored as they were backed up - no renaming of older versions of files or collapsing of paths.
- Collapsing of intermediate directories occurs:
- only when restoring selected files and/or directories,
- and when all selected patterns are compared, any common leading directories are removed, except if the directory already exists on disk.
- For example, when restoring from a backup of
/usrto/tmp/usr:- if 1 file is selected
./share/lib/lib1.a, no intermediate directories are created
=>/tmp/usr/lib1.a - if 2 files are selected:
share/lib/lib1.aand./share/bin/xeyesthe./sharewill be collapsed
=>/tmp/usr/lib/lib1.aand/tmp/usr/bin/xeyes - if 2 files are selected:
./share/lib/lib1.aand./share/lib/lib2.athe./share/libwill be collapsed
=>/tmp/usr/lib1.aand/tmp/usr/lib2.a - as above, but directory
/tmp/usr/share exists prior to the recovery, no collapsing occurs
=>/tmp/usr/share/lib/lib1.aand/tmp/usr/share/lib/lib2.a
- if 1 file is selected
- Renaming of existing files and/or directories occurs:
- only when restoring selected files and/or directories,
- and if the file to be restored already exists, then the older one is renamed, appending [<modification date>] to the file name, just before any file suffix if there is one, otherwise to the end.
- For example, restoring the file
user_guide.doc, whose modification time is 1 Oct 2007 14:65 and an existinguser_guide.docexists on disk with a modification time of 4 Nov 2007 10:12, the restored file (as it is older) is restored with the nameuser_guide[20071001.1465].doc, and the existing file is left untouched.
- Overwriting of existing files and/or directories occurs:
- only when restoring selected files and/or directories,
- and the file being restored looks like it is exactly the same as the existing file on disk (same type, same size and same modification time),
- or the file being restored and the file on disk are both >10MB in size.
Searching for files and other objects
There are two ways to search for files, directories or databases to restores:
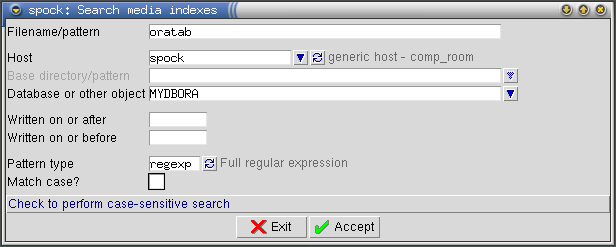
- Backup3G > Search > Search indexes , or
- Backup3G > Search > Search contents .
The results are displayed with the most recent matching backup at the top.
You can now search for database or other structured data objects. Searches can also be case sensitive or case insensitive.
New Features in backup3G 5.1
Generalised calendaring for automatic backups
Backup3G 5.2 uses the new schedule and datelist tables which provide more features than the old schedtime table:
- You can create named datelists, which, as the name implies, contain lists of arbitrary dates which can be used to either be included or excluded from a schedule.
- You can write your own program or script to determine if the current date and time is to be included in the schedule.
| Note | |
| As with schedtime, scheduling of automatic backup jobs is still implemented via CRON. | |
Media duplication now configured as part of the backup job
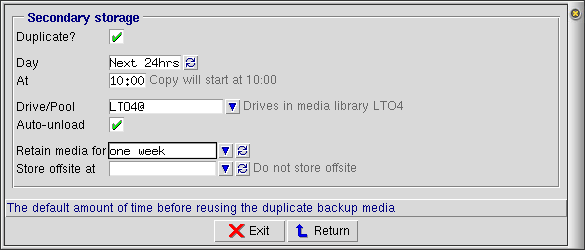
There are two ways to automatically produce a duplicate of a backup media set after the backup job has completed. This is also known as secondary storage.
- Immediate: This will immediately copy the media set used for the current backup to a new media set in the target drive after all backup steps have completed and before any post-backup commands are executed.
- Next 24hrs: This will schedule the media duplication for later in the day. The primary reason for using this mode is to remove the media duplication phase from the backup window, and typically before media is collected for off-site storage.
A common scenario is to use a VTL (virtual tape library) for the primary backup storage and a removable tape (for example, SDLT or LTO) for the secondary backup storage on the premise that writing to disk will be faster than writing to tape, and that in many cases disk in less expensive than another tape library and batch of tapes.
Verify media after the backup job has completed
blah
Sending notification of backup job status
Notification can be configured at two levels — globally for all backup jobs, and as part of configuring a backup job. If you configure notification as part of a backup job, this overrides the backup3G global notification settings.
To define notification for a backup job:
- Select the notification type
- none: do not send notification even if there are backup3G global notification settings;
- default: use the backup3G global notification settings;
- specify: override backup3G global notification settings with the following settings.
- Choose from the list of authorised COSmanager users that have a notification address set, or type in one or more email addresses.
- Select the severity from which to send notification. The default is warning.
For example, if you select success, notification is always sent — when the job ends successfully or with a warning or with an error, or when the job is killed. - Select the severity from which to also send the backup log with the notification. The default is warning.
The notification settings are also used to send notification if the backup job requires another media volume to continue and there are no more available media in the media library.
| Note | |
| To send notification via email or by other means, such as SMS, an appropriate service (for example, sendmail) must be installed and configured on the backup3G master server. | |
Notes facility
You can now attach a HTML or text file of documentation to a backup job. This file can be viewed by the user from the backup console at any time.
| Note | |
There is no facility provided to create notes files—you can simply use your favourite text editor (vi, emacs etc.). Notes files should be created in the backup_5.2/local/notes directory.
| |
Warnings
- Scan and rewind steps must be removed.
| Caution! | |
| If a backup job is allowed to rewind the tape by way of a backup step or the At-end command the backup may be rendered irrecoverable. | |
Known Problems in this Release
None known.
Hardware and OS Dependencies
AIX
None known.
HPUX
None known.
Linux
None known
Solaris
None known


