COSmanager/User Guide/Configuring COSmanager
From Documentation
←Older revision | Newer revision→
Once the COSmanager framework has been installed and licensed, you will need to work through a list of steps to set up the initial configuration.
Some of these configuration tasks supply information that is required by COSmanager; COSmanager applications will not work properly until they are done. Other tasks are optional. These extend the basic information in COSmanager to include information about your organization’s procedures and computing environment. You can run or rerun these steps at any time.
At this point, you should be in a root shell, following on from the installation phase.
Before you begin the configuration phase, you must make sure that your environment is set up correctly to run the configuration tasks. This involves:
- checking your terminal environment
- logging in to the 'cosmos' account
Setting Up an Initial Configuration
At this point you should be in a root shell.
Checking your terminal environment
To configure COSmanager your TERM variable and the Terminfo definition it refers to must both be correct. To check the current setting for TERM, enter echo $TERM:
- echo $TERM
- xterm
To check your Terminfo definition, see Appendix B—Terminal Support.
Running COSmanager configuration tasks
If you have an X display, you can configure COSmanager in GUI mode. To use the GUI, your DISPLAY variable must be set correctly and you must have licensed the GUI version of COSmanager during the installation phase. The configuration steps are the same in GUI and character mode.
- Change to the home directory of the cosmos account.
- Enter this command:
bin/cos -u cosmos
At this point, the cosmos account is the only one with access to run COSmanager.
This command starts COSmanager with the access capabilities of the cosmos account.
For now, press Continue to clear the message. In GUI mode, the COSmanager button bar is displayed:
- Figure 12 — COSmanager button bar (GUI mode)
Click on the Config button to launch the Product configuration menu.
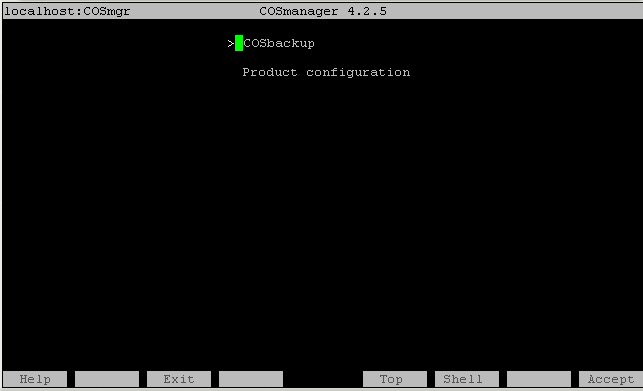
In CUI (character) mode, the COSmanager main menu is displayed:
- Figure 13 — COSmanager main menu (CUI mode)
- Select Product configuration > COSmanager configuration > Initial configuration.
This notation means “Select Product configuration, then select COSmanager configuration from the Product configuration menu, then select Initial configuration from the COSmanager configuration menu.”
COSmanager shows the list of configuration tasks.
- Figure 14 — Initial configuration tasks
- To start the configuration, select Perform > All outstanding from the menu bar.
- Note
- In CUI mode, the menu bar is accessible from the function key assigned to the Menu button—usually F8.
Work through each task in turn. The following topics contain some useful information on each task.
Set customer name
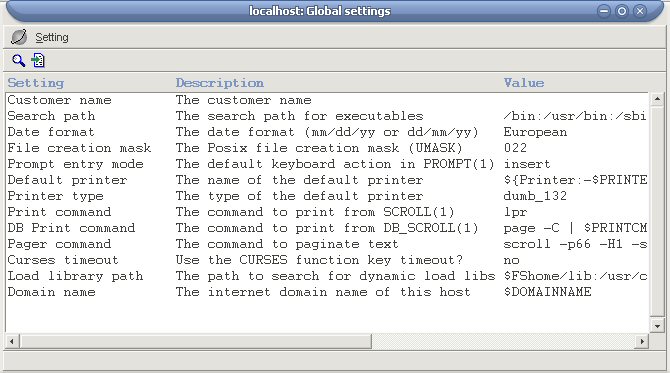
This task sets the name that is displayed to the right of the title bar on CUI-mode COSmanager screens. The name should be no longer than 20 characters. Use abbreviations if necessary. The customer name is held in the home directory of the cosmos account, in the file ~cosmos/CUSTOMER.
Steps
- Type in the customer name. Press Accept to save.
The change will take effect from the next time COSmanager is restarted. Press
Return to continue.
Set date format
This task sets the format in which dates will be displayed on all COSmanager screens. The options are:
US mm/dd/yy
European dd/mm/yy
Example: November 7, 2005 would be displayed in European format as 7/11/05, and in US format as 11/7/05.
Steps
- Select the date format. Press Accept to save.
- Note
- If you change the format, the change takes effect from the next time you start COSmanager.
Enable or change audit trail cycling
This task adds a cron entry to enable daily cycling of audit trails. This ensures that COSmanager audit trails and UNIX log files do not grow too large.
We recommend that audit trail cycling be done each night, preferably before system backups are started.
Steps
- Press Accept to add the cron entry.
- When should cycling be run? Enter a time of day in HH:MM format (24 hour clock).
Press Return to continue.
Details of each known host on the network
For COSmanager to be able to administer other hosts, each host in your network must be defined.
Filling in the host details also provides a useful inventory of all your hosts and other equipment, whether they make use of COSmanager in some way or not.
Some information is retrieved during installation from the system’s hosts file. This task prompts you to supply other information used by COSmanager.
Before you begin
First, you should define the site locations for these hosts. See Host locations.
COSmanager maintains tables of known host types and OS versions. You select from these tables when adding host details. You can add new entries; see Host details—supporting tables.
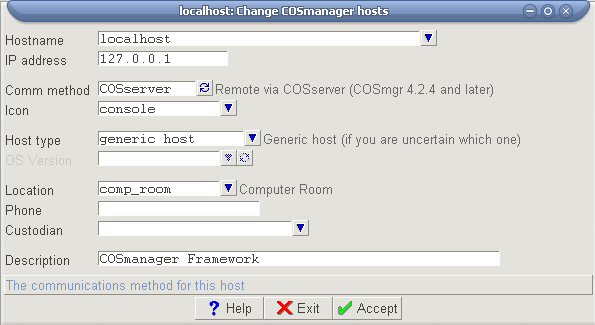
The following information must be added for each host.
- Note
- At least the Hostname, IP address, Comm method and Location should be provided. Otherwise, some hosts may be omitted when a lookup on the host information table is performed elsewhere in COSmanager.
- Figure 16 — Change host details prompt form
- Hostname
- the name given to the host. You can check this by running the commands uname or hostname. If you are updating an existing host this value should already have been picked up from the hosts file.
- IP address
- the Internet address. If you are updating an existing host this should be picked up from the hosts file.
- Comm method
- predefined methods are
- rsh
- remote shell for COSmanager version 3.0 or later.
- ssh
- remote secure shell for COSmanager version 3.0 or later.
- COSserver
- remote via COSserver (COSmanager 4.2.4 and later).
- Icon
- the icon you would like to use to represent this host
- Host type
- the brand and model of the host.
- OS version
- the operating system version running on the host.
- Location
- one of the sites defined in Host locations on page 54.
- Phone
- used for information only.
- Custodian
- a current user on the host, usually the System Administrator, chosen from a list of users in the password file.
- Description
- used for information only.
Host details—supporting tables
COSmanager maintains several tables of information about hosts, including:
- host types
- host locations
- operating system versions
You must add your host location details before adding details of each of your hosts. See Host locations.
Most of the other tables are supplied with predefined values, which will usually be sufficient. You select from these tables when defining host details for your network.
You can also add new entries to cater for any new or uncommon equipment and software in use at your site.
Host locations
All hosts, processing centers and media storage locations that your data center interacts with must be defined. At this point, you need to define host locations in before you can configure details of all your hosts.
Before you begin
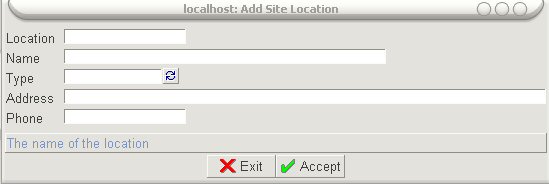
To set up a host location you will need the following information.
- Location
- a short name used to identify the location.
- Name
- the full location name.
- Location
- type the only valid type for a host location is other. The other location types are used in backup3g.
- Address
- user for informational purposes.
- Phone
- used for informational purposes.
Steps
- Figure 18 — Host location prompt form
- Select Tables > Host locations from the Host information window.
- Select Maintain > Add (or Clone to clone an existing location).
- Enter a short name or alias to identify this site location.
- Enter the name in full or brief description of the location.
- Select ‘other’.
- If you wish, enter an address and phone number for this location.
Press Accept to save this location. When you have finished adding locations, press Exit to return to the Host information window.
Host categories
This task allows you to add more categories for classifying equipment connected to your host.
Before you begin
To define new host categories you will need to know the following.
- Category
- the name used to identify a category of equipment, for example, ‘Novell’ for a Novell network server.
- Description
- a brief description of the category
Steps
- Select Tables > Host categories from the Host information window.
- Select Maintain > Add (or Clone to clone an existing category).
- Enter a name to identify the host category.
- Enter the description.
Press Accept to save. When you have finished adding host categories, press Exit to return to the Host information window.
Host types
This task allows you to add details of new host types not already known to COSmanager. Generally these will be hosts that COSmanager has not previously been ported to.
Before you begin
To define a new host type you will need to know the following.
- Host
- type the name used to identify the type, for example, ‘Sparcserver’ or ‘AT486’.
- Category
- the host category this host type belongs to (see Host categories on page 55).
- Host class
- the processor class of the host type.
- Description
- a brief description of the host type.
Steps
- Select Tables > Host types from the Host information window.
- Select Maintain > Add (or Clone to clone an existing host type).
- Enter name to identify the host type you are defining.
- Choose the host category from the predefined list.
- Choose the host (processor) class from the predefined list.
- Enter a description.
Press Accept to save.
When you have finished adding host types, press Exit to return to the Host information window.
Operating system versions
When a previously unknown host type is added to the database it is possible that the operating system version is also not predefined. This task allows you to maintain the operating system versions.
Before you begin
To define a new operating system version you will need to know the following.
- OSversion
- the name used to identify this operating system and version, for example, ‘Solaris 9’.
- Host
- class the processor class of the host type, for example ‘Sparc’.
- Description
- a brief description of the operating system and version.
Steps
- Select Tables > OS versions from the Host information window.
- Select Maintain > Add (or Clone to clone an existing OS version).
- Type in a name to identify the operating system and version.
- Choose the host class from the predefined list.
- Enter the description.
- Press Accept to save.
- When you have finished adding operating system versions, press Exit to return to the Host information window.
Network details
This task provides a way to maintain the networks file. During installation some information was retrieved (synchronized) from the networks file.
Before you begin The following information is needed to define each network. Network this should be picked up from the networks file. IP address the Internet address. This should be picked up from the hosts file. Organisation used for information only. Location the site location. You should set up all site locations before adding network details—see Host locations on page 54. Department used for information only. Alias other names used to identify this network. Comment used for information only. Steps 1. Select Tables > Network from the Host information window. 2. Select Maintain > Add (or Clone to clone an existing network). 3. Type in the name of the network you are defining. 4. Enter the Internet address for the network. 5. Enter the name of the organization that owns or is responsible for the network. 6. Choose the site location. 7. Enter the name of the department or group within the organization. 8. Enter any aliases or alternate names for the network. 9. Finally, type in a comment about the network. Press Accept to save this network information.
Allow remote COSmanager access To allow COSmanager to have trusted access to remote COSmanager hosts (so that the COSmanager password does not need to be given), a .rhosts file needs to be created in the COSmanager home directory. This task does this, and adds entries for each host whose Admin type is either Master or Remote (see Details of each known host on the network on page 50). You can allow access to other selected hosts later through COSmanager configuration > Host and network maintenance > Allow access.
Re-direct mail for COSmanager Some COSmanager processes that run in the background mail output, particularly error output, to COSmanager. As COSmanager should not be used to log in once initial configuration is complete, this mail would normally not be read. This task redirects the output to another mail address, usually the system administrator’s account. If COSmanager already has a mail file, this is saved in the file MAIL.save in the COSmanager home directory.
Steps
- Choose the user account that will receive COSmanager’s mail. Press Accept.
Mail sent to the COSmanager account will now be redirected to the nominated user account.
COSmanager users and privileges Before staff can use COSmanager, they must be added to the list of authorized COSmanager users and assigned one or more roles. In this task, you can:
- add staff and staff groups to the list of authorized COSmanager users
- add or customize user access roles
To start with there are two entries in the COSmanager User table: one for the COSmanager account itself, which is used to perform the initial configuration, and one called DEFAULT, which describes the access for any system user or group not explicitly defined in this table. At this point you must add at least one COSmanager user who has the Manager role. Manager-class users have access to all COSmanager facilities, including the ability to configure and maintain COSmanager itself. Note The Manager role should be assigned with care, as it is the COSmanager equivalent of super user privileges. You can add other COSmanager users now or later via the COSmanager configuration menu. See COSMOS Users and Access Controls on page 91 for a detailed explanation of COSmanager users, roles and capabilities. COSmanager users
- Select COSmanager users.
- Select Maintain > Add from the menu bar.
- Press Choose to list non-system accounts and groups that are not already authorized to use COSmanager. Select a user account or group from the list.
- Press Choose to list roles. Select one or more roles, then press Accept.
- You have the option of entering a descriptive comment.
Press Accept to add this COSmanager user. Press Exit when you have finished adding COSmanager users.
User access roles
- Select Global access roles.
- Select Maintain > Add from the menu bar.
- Enter a name for this role. Typical roles are based on job title (“Operator”) or function (“Config“).
- Enter a description, then press Accept to add this role.
Press Exit when you have finished adding roles. COSmanager access capabilities Each COSmanager application interprets a user’s roles as a set of capabilities. This task lets you assign different capabilities to roles to control the menus and functions within the COSmanager framework.
- Select COSmanager access capabilities.
- Select Maintain > Add from the menu bar.
- Choose a role.
- Press Choose to list the roles and capabilities already defined within the COSmanager framework. Select one or more roles and capabilities.
- Enter a description, then press Accept to save the changes.
Press Exit when you have finished defining roles.
Install and setup COSmanager applications Now that the COSmanager framework is set up, you can install your COSmanager applications. Once you choose the applications to be installed, the procedure is largely automatic; COSmanager copies the files from the distribution tape, adds the product to the COSmanager main menu, then performs any product-specific installation tasks. Like COSmanager itself, some products have a few configuration tasks that must be performed before the software is fully set up. This task starts by asking where you want to install the software from.
Figure 19 — Installing a COSmanager application
Simply follow the instructions under Application Installation on page 68. You can also install COSmanager applications at any time from the COSmanager configuration menu.


